
How to Replace Kitchen Cabinets
Are you ready to toss those old cabinets? Refresh your home by replacing kitchen cabinets yourself. DIY cabinet installation is not a simple project, but with some work, it’s something that anyone can do. Not only will it improve function and aesthetics in your home, but it will also add to your home's value. Updating your cabinets is not just limited to the kitchen. It can include any area like entertainment centers, bar cabinets, home office cabinet remodels and more.

If you dedicate some time to research and prepare yourself, this will be one of the most satisfying home projects you complete. Replacing kitchen cabinets is a multi-step process. It starts with inspiration all the way to cabinet installation. Here you will learn how to replace your cabinets from start to finish, plus the tools needed and more.
Table of Contents
Step 1: Measure Your Space
Measuring is an important first step in replacing kitchen cabinets. Before grabbing your tape measure, find a notebook and pencil to write with. Create a simple, neat drawing of your room. This drawing does not need to be to scale. Just make sure each wall is represented with any potential obstacles. To start the measuring process, follow these instructions:

- Measure the full length of each wall from inside corner to inside corner. Include all windows, doors and openings including trim.
- Number each wall for reference and label adjacent rooms for clarity.
- Note which walls are interior and exterior walls and record all measurements in inches.
- Start measuring each wall in segments like the corner of a wall to the window. Measure to the outside edge of all openings and label each section alphabetically.
- Note on the floor plans where any radiators, chimney chases, vents, floor registers and pipes are located. Draw a box with an ‘X’ in it to note their location. Include the dimensions of the obstruction and the distance to the nearest wall.
- Determine the ceiling height by measuring in three separate locations from floor to ceiling to account for irregularities.
- Include measurements to the bottom of any pre-existing soffits along with height and depth if they are not being removed.
- From the nearest corner wall, measure to the centerline of any water supply lines, power sources for appliances, heat and air conditioning vents, electrical outlets and light switches. Also note how far off the ground these utilities and mechanicals are located. To avoid confusion, it’s best to draw a separate floor plan.
After your floor plan is drawn out, start looking for design inspiration, kitchen cabinet pricing and more!
Step 2: Order Cabinetry
Now that you have your measurements ready to go, it’s time to order cabinets. Do yourself a favor and connect with an experienced professional who can assist with design. There are many free remodeling resources out there, so take advantage of them.

Using a kitchen designer will benefit you by saving you money, preventing design mistakes aligning with codes and adding function to your kitchen. Not to mention, you don’t have to worry about using an online DIY design tool.
Take your measurements to a professional designer and discuss all your project goals. This could include specific storage solutions, functional needs, appliances and even design style. Designers are experts for a reason and have many creative tricks up their sleeves to get you what you want.
Once you finalize your design and are comfortable with the kitchen cabinet pricing, it’s time to order cabinets. Your designer will provide you with an estimated lead time, but keep yourself informed along the way so you can adjust installation plans if needed.
Step 3: Remove Old Cabinets
As delivery day gets closer for cabinets, it’s time to start thinking about demolition. Confirm your cabinet delivery date from the final mile carrier before tearing out any cabinets. It is possible to experience delays and you don’t want to be stuck without a kitchen.
Locate a space in your home for a temporary kitchen while construction is underway. Some homeowners like to use pre-existing bar cabinets and others set up sawhorses and a plywood countertop for a microwave, coffee maker and air fryer. It’s always nice to have access to a sink, however bathroom sinks can work temporarily for washing dishes.
Before getting started, consider asking a friend or family member to assist you with the removal process, making it easier and safer for everyone.
How to Remove Kitchen Cabinets
Once your temporary kitchen is set up, it’s time to get to work. Start by unplugging and removing all appliances big and small. Turn off and disconnect any water supply lines for dishwashers and refrigerators, and detach the sink and garbage disposal. Follow that task by removing the base cabinet toe kick strips.
After that’s complete, remove doors, drawers, shelves and cabinet accessories from every cabinet box with a power drill. Then use a utility knife to cut through paint and caulk touching any cabinet edges throughout the kitchen.
Grab your power drill and start unscrewing cabinet sides first until each cabinet is complete. Then, remove screws from the cabinet back where it's secured to the wall and slowly lift the base cabinet or pull the wall cabinet off the wall. Continue this process across the remainder of the kitchen.
Step 4: Prepare Your Space
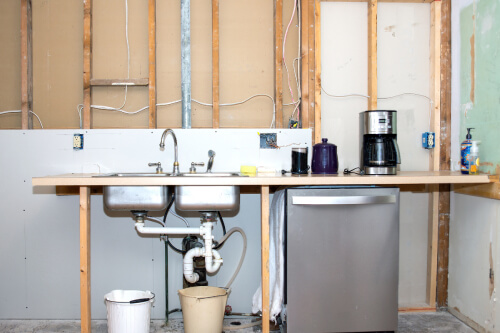
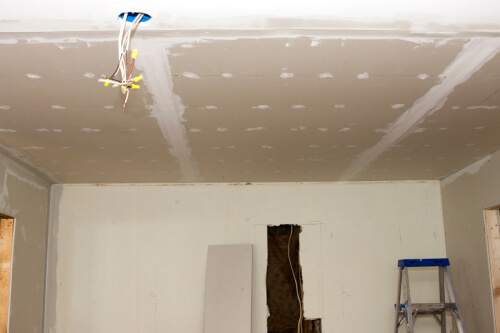
Are you making major alterations to your space? Moving the sink plumbing, shifting the refrigerator to a different wall or adding extra outlets are all great things to do prior to cabinet installation when the room is clear. Make these updates now along with any framing, drywalling, taping, mudding or patching that’s needed.
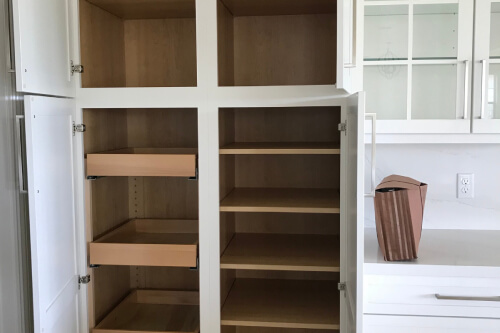
Additionally, clear the room of any other furniture and debris to make way for your cabinet delivery. New cabinets come assembled in individual boxes- unless they are RTA, and will need plenty of storage space. When cabinets finally arrive, give them a few days to acclimate to your home, then start inspection and installation.
Step 5: Install Kitchen Cabinets
Cabinet installation day is a big milestone, so take your time prepping the space. Review your design plans and take inventory of all cabinets, parts and tools needed one final time before getting started. New flooring should be installed before cabinets, but if not, include that measurement when determining your cabinet mounting heights.

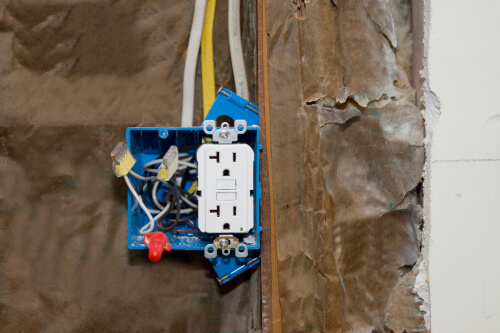
Prevent injuries by turning off all water supply lines, gas lines and electricity. Confirm electricity is off by using a circuit tester at each outlet and exposed wire. If you are concerned about this, contact your local utility company or service professional.
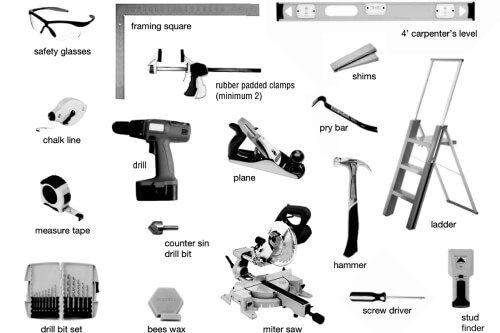
The following DIY cabinet installation steps are for wood stud construction only.
Preparation
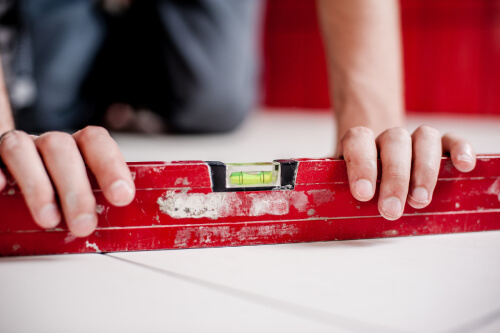
- Locate the highest point on the floor with your level. Move around the room where the base cabinets will be placed and mark the highest point for reference.
- Repeat this process at 21-½ inches away from the wall where the base cabinet toe kick will sit and mark the high points. Compare it to the other previously marked high points. Use whichever high point is greater for the following steps.
- Use a laser level if possible and measure up the wall from your floors high point to 34-½ inches and draw a level line around the kitchen perimeter. This is the level line that you will use to install base cabinets.
- Next, measure up from the floor’s original high point to 54 inches. Use the laser level again to draw a level line around the kitchen perimeter. This line will be used to indicate wall cabinet installation height.
- Locate the wall studs in the kitchen with a stud finder and mark their locations for reference.
- Use a long straight edge and carpenter's level to check walls for uneven spots. High spots can be removed by sanding and low spots can be filled by shimming behind cabinets.
- Attach a furring strip below the wall cabinet mounting line. This will provide support as you install wall cabinets and ensure they are level.
- Organize your cabinets in the order you will be installing them, starting with corner cabinets.
- Remove all doors, drawers and cabinet accessories to prevent damage during installation. Mark each piece and where it came from to make re-assembling easier after installation.
- Always start with wall cabinets to avoid leaning over base cabinets during installation.
Wall Cabinet Installation
- If they haven’t been marked yet, locate the wall studs and cabinet mounting height at 54 inches above the finished floor. Then, mark these locations on the wall.
- Make sure that each wall cabinet can attach to at least one wall stud. If you’re using framed cabinets, measure the cabinet distances by using the front cabinet face frame reveal because it’s wider than the back of the box.
- Start with the corner wall cabinet. Transfer the stud locations minus one inch to the back of the corner wall cabinet.
- On the same cabinet line, make a mark down 2 inches from the top and 2 inches up from the bottom, then intersect these measurements with the stud locations.
- On the marked intersections, drill through the cabinet back using a 3/32-inch drill bit. Repeat this process for all other markings.
- Raise the cabinet into place resting on the ledger rail and fasten it to the wall with a #8 x 2-½" pan head trim screw, but don’t fully tighten.
- Check the cabinet is level and shim where necessary.
- Repeat the measuring, pre-drilling and installation for the remaining wall cabinets.
- Carefully align all the cabinet face frames with a C-clamp or quick-grip tool.
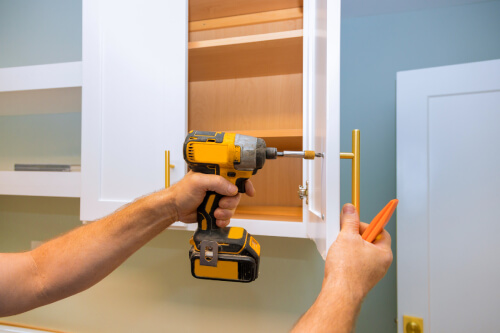
- Drill a 3/32-inch pilot hole in three places along the hinge side of the adjoining face frames followed by counter-sync drilling.
- Use beeswax on trim screws to reduce resistance as you drill screws into the face frame. For appearance purposes you can hide two of the trim screws behind the hinge plates.
- Continue this process until all the wall cabinets have been installed.
- Do one final check that all cabinets are level and trim, then tighten all the screws. Use the same methods to attach fillers where needed.
- To attach loose decorative panels, gently sand the back of the end panel for a smooth surface and wipe clean after sanding.
- Position the panel over the cabinet side to do a dry-fit test. Trim the end panel if necessary.
- Apply the panel using contact cement or construction adhesive then apply the adhesive per the manufacturer’s instructions. Some adhesives may require brad nails to secure the panel along with the adhesive.
- Move on to base cabinet installation to complete your kitchen.
Base Cabinet Installation
- Start base cabinet installation after all wall cabinets have been installed.
- Identify all stud locations and mark them on your walls if not already marked.
- Starting with your corner base cabinet, measure from the corner to the first wall stud on the back of your cabinet and make a mark. Repeat this step for the next stud location on each cabinet.
- Measure down 2 inches from the top of the stud location, and 2 inches up from the bottom of the stud location and draw a line intersecting the two measurements.
- Drill through the base cabinet back using a 3/32-inch drill bit and repeat this process for all stud locations.
- Move the base cabinet into place and check that it’s level and plumb.
- Follow the floor high-point levels and shim where necessary.
- Fasten the cabinet to the wall with #8 x 2-½" pan head trim screws, but don’t fully tighten them. Following the corner cabinet, move on to the sink base cabinet. Always measure your base cabinet locations using the front face frame reveal if you purchased framed cabinets. This part of the cabinet is wider than the cabinet box.
- Align the next cabinet box up to the corner base cabinet shimming where necessary. Clamp the face frames together using a C-clamp and repeat the same installation process.
- Drill 3/32-inch pilot holes through the face frame followed by counter-syncing the drill holes.
- Use beeswax to coat the pan head trim screws to avoid resistance and cracking the face frames, then screw them together.
- Continue around the room until all base cabinets have been installed.
- Return to each cabinet making sure they are level and plumb, then tighten all the screws and base cabinet installation is complete.
- Move on to deep refrigerator cabinet installation.
Refrigerator Cabinet Installation
- Begin by attaching the refrigerator end panels to any adjacent wall and base cabinets with #8 x 2-½" pan head trim screws. Make sure the panels are plumb and level.
- For additional strength, attach the panels to vertical furring strips on the back wall.
- Next install a horizontal furring strip for the deep refrigerator cabinet to rest on during installation.
- Construct a temporary brace to support the cabinet front from the floor up.
- Install the deep refrigerator cabinet like all other cabinets.
- Move on to tall cabinet installation.
Tall Cabinet Installation
- Refer to your kitchen floor plan to determine which tall cabinet needs to be installed first if you have more than one.
- Determine the location of the first wall stud and transfer that measurement minus one inch to the back of your tall cabinet. Find the second stud location and repeat.
- Measure down 2 inches from the top of the cabinet back, and up 6-½ inches from the bottom of the cabinet back and intersect these lines with the stud locations.
- Find the middle mark between the top and bottom lines and mark it for a third attachment point.
- Drill through the tall cabinet back panel using a 3/32-inch drill bit in all six locations.
- Move the tall cabinet into place and check that it’s level and plumb.
- Typically, 96-inch-tall pantry cabinets come with a separate toe kick and finished end panel. This is to make installation in kitchens with 8-foot ceilings easier since they cannot be tipped into place in this scenario. Assemble your toe kick box, lift the pantry into place and use the pan head screws to fasten them together.
- Finish your tall cabinet by gently sanding the back of the finished end panel and trimming it to fit.
- Apply the panel using contact cement or construction adhesive then apply the adhesive per the manufacturer’s instructions. Some adhesives might require brad nails to apply the panel along with the adhesive.
- Shim where necessary and fasten the pantry cabinet to the wall and any adjoining cabinets using #8 x 2-½" pan head trim screws.
- Trim to fit all toe kick strips and use your touch-up kit to cover any nail holes.
- Now your kitchen remodel is complete and it’s time to schedule countertop templating and installation!
Does DIY cabinet installation look intimidating? Consider using cabinet installers. CliqStudios offers professionals installers who are licensed and insured, background checked and performance screened. To find out the cost to install kitchen cabinets, explore cabinet installation today!
Do You Prefer Kitchen Cabinet Door Replacement?
Does a full-scale kitchen remodel sound like too much? Then replacing cabinet doors might be a better option. Cabinet refacing may be a smaller project, but it still requires an investment of time and hard work.
There are two options to choose from in this category. You can either use a full-service cabinet refacing program or an a-la-carte program. Full-service programs will update and replace cabinet doors, drawer fronts, and cabinet handles plus refinish cabinet face frames. Some of these services even offer add-on cabinet accessories like roll-out trays and lazy susans.
Option two is a-la-carte cabinet refacing which means you can send in your door and drawer measurements and install everything yourself. This route involves DIY work like refinishing cabinet boxes by sanding, priming and painting followed by door hinge and drawer glide installation. You will most likely drill for your own cabinet handles and put the cabinet doors up as well.
Once you have identified the path you would like to take, do research on credible companies and talk to a professional to get started.
Conclusion
As you can see, changing cabinet doors by refacing or ordering brand-new cabinets is a commitment that will take time and energy. Refacing is a great option if you want a temporary fix and new look. However, if your kitchen is lacking function and style, new kitchen cabinets are the way to go.
CliqStudios offers a wide variety of cabinets in every style and budget. Whether you like more hands-on work with RTA cabinets or prefer custom cabinets, we have you covered. CliqStudios is proud to be a one-stop shop where you can find the perfect cabinets, kitchen hoods, cabinet handles, countertops and more.
Explore CliqStudios cabinets today to get started on your remodel!
Frequently Asked Questions
How do I change cabinet doors?
Change cabinet doors by using a power drill or Phillips screwdriver and removing all screws from the cabinet hinge. The hinge attaches to the cabinet door and face frame so there will be at least 4 screws. As you remove screws, hold on to the cabinet door to avoid damage as it releases from the cabinet.
Once you have removed the pre-existing doors, apply the new hinges from your refacing company to your brand-new custom doors. Install one at a time with a jig like the Kreg cabinet door mounting jig. This will help hold doors in place while you screw the hinges and doors on to the cabinet. Once you have installed all your cabinet doors, use the adjustable screws to make the doors level.
How do I hang wall cabinets?
Follow the step-by-step instructions below to install your new wall cabinets. For more installation videos, view the CliqStudios video library.
- Locate the wall studs and cabinet mounting height at 54 inches above the finished floor. Mark these locations on the wall.
- Try to make sure that each wall cabinet can attach to at least one wall stud. Always measure the cabinet distance by using the front cabinet face frame reveal because it’s wider than the back of the box.
- Install ledger rails under the marked mounting height for support during installation.
- Start with the corner wall cabinet. Transfer the stud locations minus one inch to the back of the corner wall cabinet
- On the same cabinet line, make a mark down 2 inches from the top and 2 inches up from the bottom, then intersect these measurements with the stud locations.
- On the mark intersections, drill through the cabinet back using a 3/32-inch drill bit. Repeat this process for all other markings.
- Raise the upper cabinet into place resting on the ledger rail and fasten it to the wall with a #8 x 2-½" pan head trim screw, but don’t fully tighten.
- Check the upper cabinet is level and shim where necessary.
- Repeat the measuring, pre-drilling and installation for the remaining wall cabinets. If you purchased framed cabinets, always measure for cabinet placement based on the cabinet face frame. This part of the cabinet is wider than the box.
- Carefully align all the cabinet face frames with a C-clamp or quick-grip tool.
- Drill a 3/32-inch pilot hole in three places along the hinge side of the adjoining face frames followed by counter-sync drilling.
- Use beeswax on trim screws to reduce resistance as you drill screws into the face frame. For appearance purposes you can hide two of the trim screws behind the hinge plates.
- Continue this process until all the wall cabinets have been installed.
- Do one final check that all cabinets are level and trim, then tighten all the screws. Use the same methods to attach fillers where needed.
- To attach loose decorative panels, gently sand the back of the end panel for a smooth surface and wipe clean after sanding.
- Position the panel over the upper cabinet side to do a dry-fit test. Trim the end panel if necessary.
- Apply the panel using contact cement or construction adhesive then apply the adhesive per the manufacturer’s instructions. Some adhesives may require brad nails to secure the panel along with the adhesive.
Contact your CliqStudios kitchen designer with any questions on your floor plan or installation along the way.
What is the average kitchen cost?
The national average cost to remodel a kitchen is about $26,268. That number doesn’t tell the whole story though. Your new kitchen could cost anywhere from $14,000 to $50,000 or more, depending on the size and scope of your project. Typical kitchen remodels range from $14,607 to $40,616 including the cost of kitchen cabinets.
The project cost depends on the style, color of cabinets and finishes. If you choose more basic cabinets and finishes, you will likely pay the low end of that price range and vice versa if you select more intricate design elements.
How do I remove kitchen cabinets?
When removing kitchen cabinets, make sure you have taken precautions to keep yourself and any helpers safe. Start by turning off electrical and disconnecting gas and plumbing lines. Use the following instructions to remove your kitchen cabinets:
- Remove all doors, drawers, shelves and cabinet accessories.
- Use a utility knife to cut caulk lines or paint touching cabinets.
- Use a power drill to remove all screws from the cabinet sides.
- Find a friend or family member to help, then remove all screws from the back of each cabinet. Slowly lower wall cabinets to the ground or lift base cabinets from the ground.
- Remove all cabinets and debris and prepare your space to receive new cabinetry.
For more in-depth instructions to remove and install cabinets, visit CliqStudios now!
Where do I buy new kitchen cabinets?
CliqStudios offers kitchen and bath cabinets in standard and custom sizing with any type of cabinet storage. We offer cabinet accessories, microwave base cabinets, custom cabinets and much more. Options are available in all CliqStudios cabinet lines from RTA to Craftsman so you can get your dream design in any style and budget. Shop cabinets to complete your kitchen and bath design now!
What is the cost of kitchen cabinets?
The 2024 national average for kitchen cabinets is $2,500 - $24,000. Most kitchen cabinets sit within the $4,000 - $13,000 range, but this does not include cabinet installation or kitchen countertops.
With that said, each kitchen design is completely unique. Specific pricing for you will be based on the size of your kitchen, quantity of cabinets, upgrades like storage solutions and designer finishes and whether you hire cabinet installers or choose DIY installation. As you can see, this pricing is subject to every homeowner’s personal preference.
For the most accurate kitchen cabinet estimate, contact a CliqStudios designer now!
